

|
| ||||||
|
|
| ||||||
| ||||||
|
| ExifCnv is a utility that converts JPEG files prepared by the user into the format that can be displayed on the AV-P960. As an additional function, ImageViewer for JPEG is also provided for checking the contents of images. Note: Some JPEG files may not be converted by this software. |
| Operating environment Compatible OS: Microsoft Windows 98, 98SE, ME, XP, and 2000. mfc42.dll and msvcrt.dll are required. |
| How to install Copy ExifCnv.exe file to whatever folder you want. |
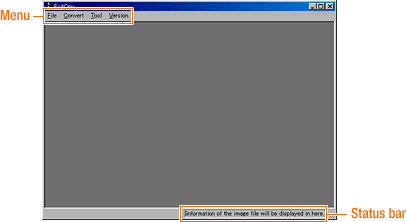
| How to operate When you start ExifCnv.exe, the screen below is displayed. |
 |
| [Convert] Batch Convert The figure below shows the setting dialog for image conversion, which is the main function of this program. |
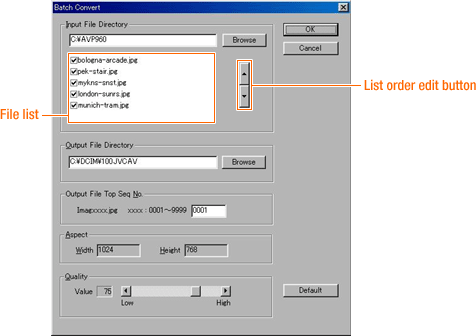 |
| Input File Directory This specifies the folder in which the original image is stored. Specify this folder by inputting it directly or by using the Browse button. When you specify the input directory, a list of the JPEG files in the folder is displayed in the file list. Conversion is carried out in the order of files in this list. To change the order in which files are converted, select the name of the file whose position in the list you want to change by clicking it, then change its position in the order with the list edit buttons. If you remove the checkmark from the checkbox to the left of a file name, that file is no longer subject to conversion. (The default is for the checkbox to be checked.) The maximum number of files that can be converted is 9999. | |||
| Output File Directory This specifies the folder in which the converted image will be stored. Specify this folder by inputting it directly or by using the Browse button. Note: In order to make an SD card that can be displayed with the AV-P960, the folder composition below is necessary.
| |||
| Output File Top Seq No. The conversion is executed in the order of files in the list. (Only files whose checkboxes are checked are converted.) After conversion, the file is renamed Imagxxxx.jpg (where xxx is the original's position in the order to conversion.).
Specify a number from 0001 to 9999. After Imag999.jpg, the numbering returns to Imag001.jpg Be careful with this numbering. If the output destination folder already has an image file with the name of a new image file, the new image file overwrites the old one. | |||
| Aspect The output image size is fixed as 1024 x 768. (Because the AV-P960 only supports the XGA size.) | |||
| Quality This sets the compressed image quality for the converted file. The setting range is 1 - 100 (default of 75). The larger the value, the higher the image quality after conversion and the larger the file.
| |||
| Default Returns the dialog settings �iInput File Directory, Output File Directory, and Output File Top Seq No.) to their defaults. | |||
| When you complete the settings, click [OK] to start conversion processing. During conversion, a dialog displays the progress status. To stop a conversion that is underway, click [Abort]. |
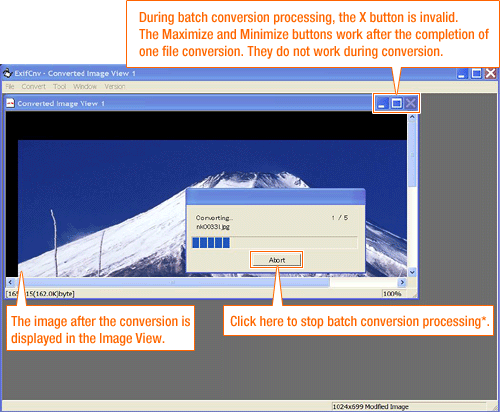 Screen during batch conversion |
| *If you click [Abort] during conversion of multiple images, the processing is stopped after conversion of the current image is complete. |
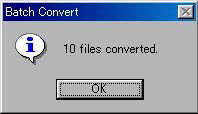
| When the conversion processing is complete, the dialog box below appears. Click [OK] to end the conversion. |
 |
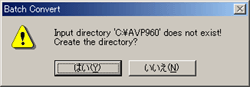
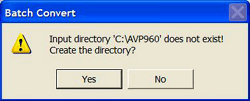
| If the folder specified as the Input File Directory does not exist The dialog below is displayed to ask you whether or not to create the directory. If you click [Yes], the folder is created. Put the image files into the folder just created, then re-do from Batch Convert in the menu. If you click [No], the conversion is canceled. | ||||
| ||||
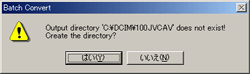
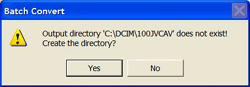
| If the folder specified as the Output File Directory does not exist The dialog below is displayed to ask you whether or not to create the directory. If you click [Yes], the folder is created, then the conversion starts. If you click [No], the conversion is canceled. | ||||
| ||||
| If a file can not be converted by this software The dialog below is displayed to let you know that the processing for that file has been skipped. When you click [OK], the conversion and file name number assignment are skipped and the conversion continues from the next file. | |
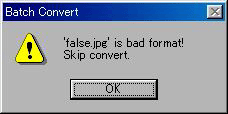 | |
| Below are added function besides conversion. [File] These are JPEG ImageViewer operations Open (Ctrl+O) Selects an image and opens it. Close (Ctrl+F4) Closes the selected image. [Tool] Status Bar Switches the status bar display on/off. Size Up ( ] ) This is added to the pop-up menu when an image is opened. It enlarges the display of the selected image. This is not valid during conversion processing. Size Down ( [ ) This is added to the pop-up menu when an image is opened. It reduces the display of the selected image. This is not valid during conversion processing. Size Raw (Ctrl+Alt+0) This is added to the pop-up menu when an image is open. It is valid when the selected image is displayed other than at x1. It displays the selected image x1. This is not valid during conversion processing. Fit window (Ctrl+F) This is added to the pop-up menu when an image is opened. Adjusts the window size to match the image. [Window] This is added to the menu when an image is open when batch conversion starts. Layer Displays the image windows layered on top of each other. Horizontal Displays the image windows lined up horizontally. Vertical Displays the image windows lined up vertically. Close All (Ctrl+L) Closes all the image windows [Version] Displays the version of this program. |
| Displays information on the open image (image size, compression information) and batch conversion size information (main image). |